
"I gave you all I had..."
Photography By: Bob Symons - Location: Bumfish Flats Farm - Animal Companions: Boof (Packhorse), Freckles (Trusty Steed), Jed (As Cain), Mozzie (Emotional Support) - A huge thank you to Kate for all your help!
THE MAKING OF...
To start, let's address the rat in the proverbial gang. I am not a burly, over 6" outlaw living in wild west 1899. A fact for which I am quite grateful, considering the medical treatment available at the time and my overall lack of tolerance for alcohol as a replacement for water. The reason I'm telling you this? Well, because it means that this costume is my gender swapped interpretation of Mr Morgan, not a right-on-point manly man Mr Morgan...just in case you couldn't already tell...
The Pants...Ahem, with that out of the way, let's get started. I didn't want to just jump into a pair of pants and call it a day for this here lady version of everyone's favourite Red Dead boay, and after a bit of research it became clear that a lot of women of the time had taken to wearing bifurcated skirts in order to tackle the world with style and move-ability.
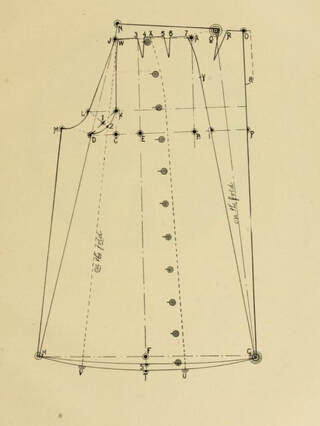
When I found an online copy of the 1897 publication: "Superlative Systems of Cutting Ladies' Garments" by Chas J. Stone, I nearly had a conniption I was so excited, and I set to drafting it from the instructions pretty much right away. Want to check it out? https://archive.org/details/superlativesyste00ston/page/n6 |

|
|
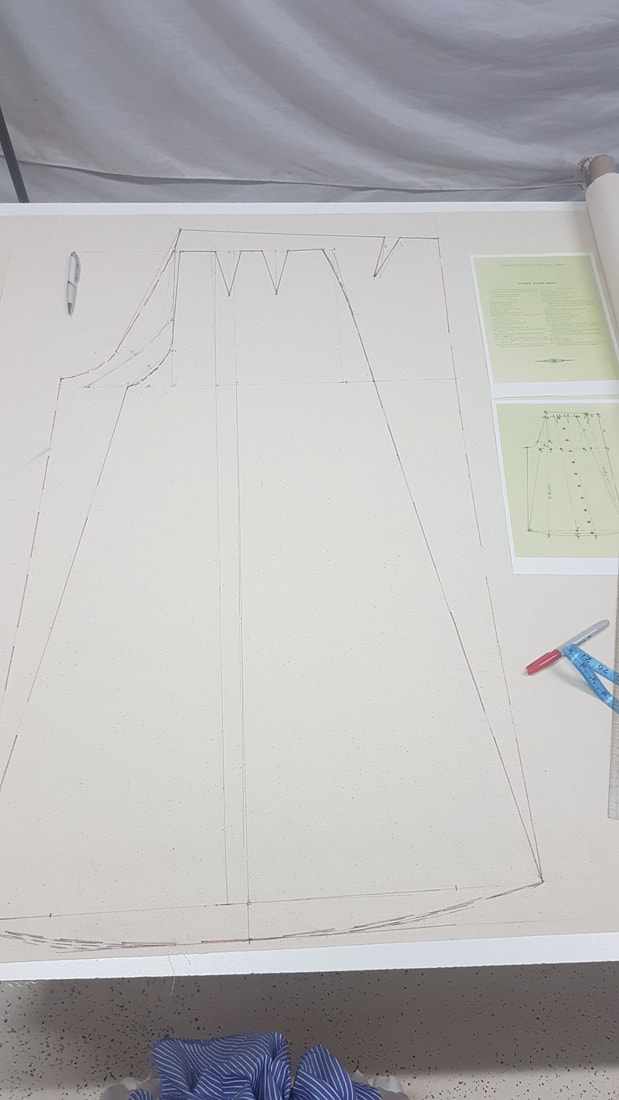
For those of you new to the pattern creation world, drafting a pattern from scratch basically means you have step by step instructions, a blank piece of paper, some measurements and from that you draw out you pattern. The instructions are a bit tricky to follow, I mean, just give these babies a read, and to be honest I have never been a huge fan of this kind of pattern creation. This is mainly because my brain spazzes out every other step and I start having an argument with my paper along the lines of: "How long is H to G meant to be? Why have they not told me this?! You want me to draw out to H and G from F but how can I do that if you don't tell me how far away G is from F OR H!" |
I am lucky my workroom isn't within earshot of anyone or I might have already been committed.
Despite my arguments with myself and the inanimate objects of my drafting table, I eventually ended up with a working pattern. This baby was then redrawn out so it was individual pieces and laid out of my fabric. My fabric choice for these pants was made based on colour and texture, and despite ticking most of the boxes it was far more lightweight than I would have liked.
Despite my arguments with myself and the inanimate objects of my drafting table, I eventually ended up with a working pattern. This baby was then redrawn out so it was individual pieces and laid out of my fabric. My fabric choice for these pants was made based on colour and texture, and despite ticking most of the boxes it was far more lightweight than I would have liked.
|
To fix this I reinforced it by cutting a 'lining' out of calico and basting it to the pieces before sewing everything together. This actually worked really well and gave the fall and body to the garment that I think it needed.
Despite using a pattern from 1897 for these pants, I'm afraid I skipped ahead and used very modern methods of construction to finish them. I would have liked to say I used authentic button closures and seam finishing techniques, but it would be a lie. I didn't. I overclocked those babies and added an invisible zip. It cut a good couple of hours off construction time and I bet if the folks in the 1900's had the option, they'd totally have done it as well...But I know there ware many historical garment enthusiasts out there pulling their hair out. So to you lovely people...I'm sorry. |
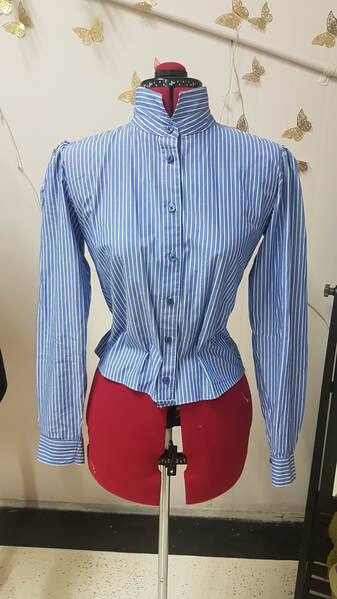
The Shirt...A lot of elements of this costume were op shopped and then edited for my own purposes. I was lucky enough to find a shirt that matched in colour/style to Mr. Morgan's and with a few alterations managed to make it look the way I wanted it to.
I added darts in the back, took in the side seams by a good 15cms, altered the collar shape, pulled out the sleeves so I could slim them to the cuff and gather them at the head before sewing them back in. Finally I cut about 20cms off the bottom and hemmed it. I foolishly didn't take any pics of this process because I did it a 1am and was on some sort of sleep-deprivation-sewing high...but here is a picture of it finished! Yay! Just imagine it as a modern, flat, straight sleeved, collared shirt that was a a size 16 to begin with and you'll get the general idea. |
|
....The Belt
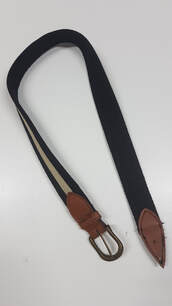
From the images I could find on ye old interwebs, women didn't often wear suspenders. But they did wear belts, and I am always a fan of a good belt. So to substitute Mr Morgans suspenders I went out and found a belt that was about the right kind of creamy, yellow colour to match his. Then I trimmed it down, sewed a black casing into it to mimic Arthur's suspenders and reattached the buckle/leather ends.
This was a 12:30am task, done shortly before the 1am shirt. So there is equally little photographic evidence of this process. I blame the coffee and the amazing ability I have to hyper focus on something until I suddenly realise it's been three hours and the sun is about to come up.
This was a 12:30am task, done shortly before the 1am shirt. So there is equally little photographic evidence of this process. I blame the coffee and the amazing ability I have to hyper focus on something until I suddenly realise it's been three hours and the sun is about to come up.
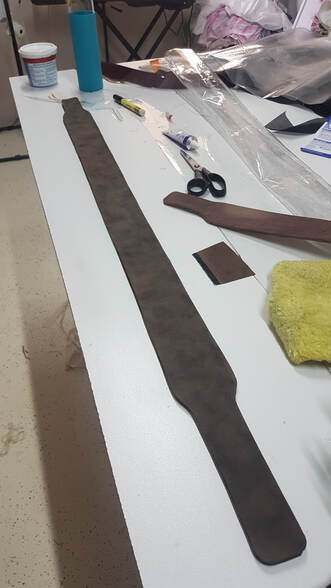
The Jacket...The jacket Mr Morgan wears was something I wasn't looking forward to tackling, simply because jackets take time and effort. So I headed to the thrift store to see if I could find something. And find something I did! The jacket is a beige suede and despite having the wrong colour buttons and collar, it was pretty close to perfect. I stained the collar with a brown ink (several layers required) and replaced the buttons with a black (though I may change them to brown later on), and voila! Arthur Morgan's jacket...or close enough.
|
|
|
|
...The Gun BeltOk, so the holster belt took a lot more effort and time than I would like to admit. I had wanted to work with leather and do a proper gunbelt, but I didn't have the $300 ish I would need to buy the skin alone. That's not including the cost of leather dyes, tools, threads and needles I would need to purchase for the process.
A lot of people don't realise that leather working is a whole other ball game with it comes to construction. It is arguably easier in some ways, but the gear you need is pretty different to what is needed for fabric. So...the experimentation began. |
|
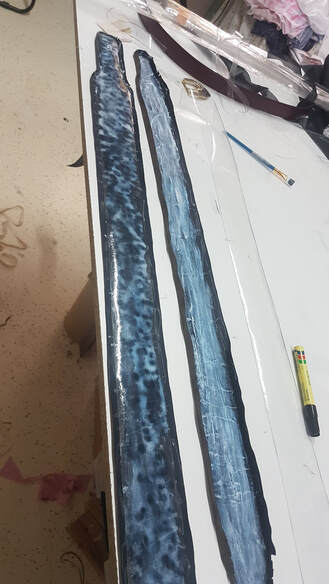
I started with a fabric backed soft cream vinyl, which I cut my pattern from, stitched and then stained with a calligraphy ink. This didn't work the way I wanted it too as the fabric vinyl sucked up the ink and continued looking like fabric. It also didn't have the same weight as leather has, nor did it move the same way. I puzzled over this for a while before reverting to something I had used before in my Elsa cosplay. Plastic. By cutting a thick plastic the same width/shape as the gunbelt and mounting it to the fabric with contact cement I was able to get the movement I wanted that mimicked leather. I also found another pleather with a suede texture that, after being stained and sanded back, gave exactly the right worn leather look. For ease of explaining, this is how I cut for the belt: A) 1x Gunbelt pattern w 1cm SA MAIN FABRIC B) 1x Gunbelt pattern w/o 1cm SA / -2mm cut from all edges MAIN FABRIC C) 1x Thick plastic Gunbelt pattern w/o 1cm SA D) 1x Thin plastic Gunbelt patternw/o SA / -1cm from all edges |
|
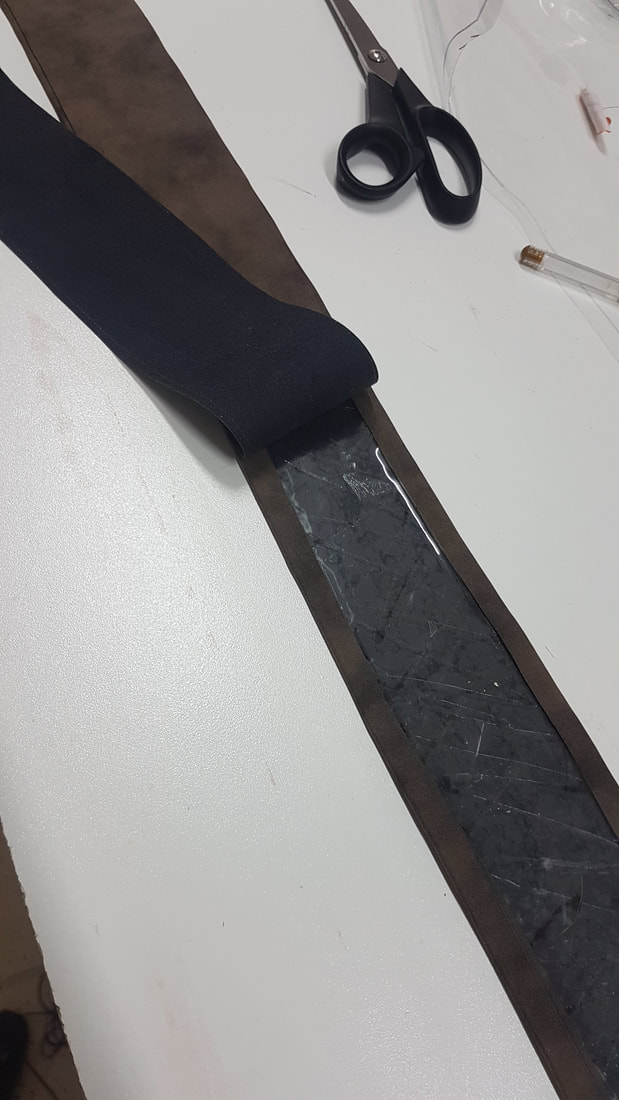
I tried a few different ways to finish the belt, and found pretty quickly that the easiest way to do it was to glue C to A along the centre, then fold back the seam allowance of the fabric and glue that down.
This is actually a very similar way to finish leather seams, where you fold the seam back and glue it in place before beating the every living daylights out of it with a hammer to flatten it.
D was then glued to B along the centre and glued wrong sides together to the A+C combination. You end up with something that looks like what is below.
|
|
|
|
|
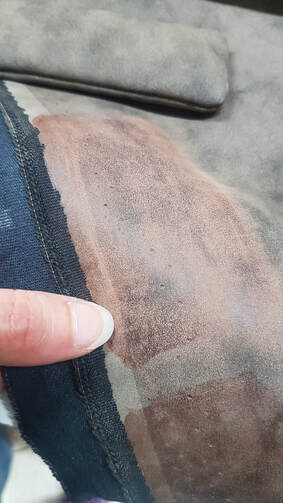
This was topstiched with an upholstery thread then stained with the ink, left to dry before being sanded back to give me that worn leather looked I was talking about before.
This worked out really well, and from there it was just a matter of attaching the bullet loops. I used the same method as the belt itself to create the strip used for the bullet loops. measured out where I wanted them to go + their width etc and made an incision at the first and last point so I could pull the strip through to the back of the belt. |
II realised here (too late) that I had made a mistake and I actually should have stitched the bullet loops on before putting the back of the belt on, which would have left me with a much nicer finish, but hey. Live and learn right?
|
Last thing to do was to add the belt buckle, which I found from these AMAZING people:
http://www.westernleatherholster.com/western-belt-buckles/ These guys are a leather working/museum replica shop in Georgia, US, and they were wonderful to deal with. As you can see, the belt buckle is pretty much exact to our Mr Morgan and when I found it on their website I nearly wept for joy. The people who run and own Western Leather Holsters travel around to museums and take castings of the western buckles/make replicas of western memorabilia and the work they do is...muah! This particular buckle is a Jake Spoon replica from the Texas Ranger mini series aired back in 1989. Mine is made from American Brass. |

|
The Gun and Knife Holster...
The holster and knife belt were made in much the same way to the gunbelt re the construction with the fabrics etc. The tricky part for this one was getting the pattern down pat. I googled A-LOT for this and found a few pretty fantastic references that I altered until I got something that mimicked Mr Morgans. The process was quite repetitive, so have a handy little slideshow to demonstrate visually what I am useless at explaining. And you know what? The kife holster...ah...case...thing? Well, that is again the same damn thing and I didn't even film it because I was so keen to just finish this amazingly crazy adventure.
So. Use your imagination my Vulpines.
So. Use your imagination my Vulpines.
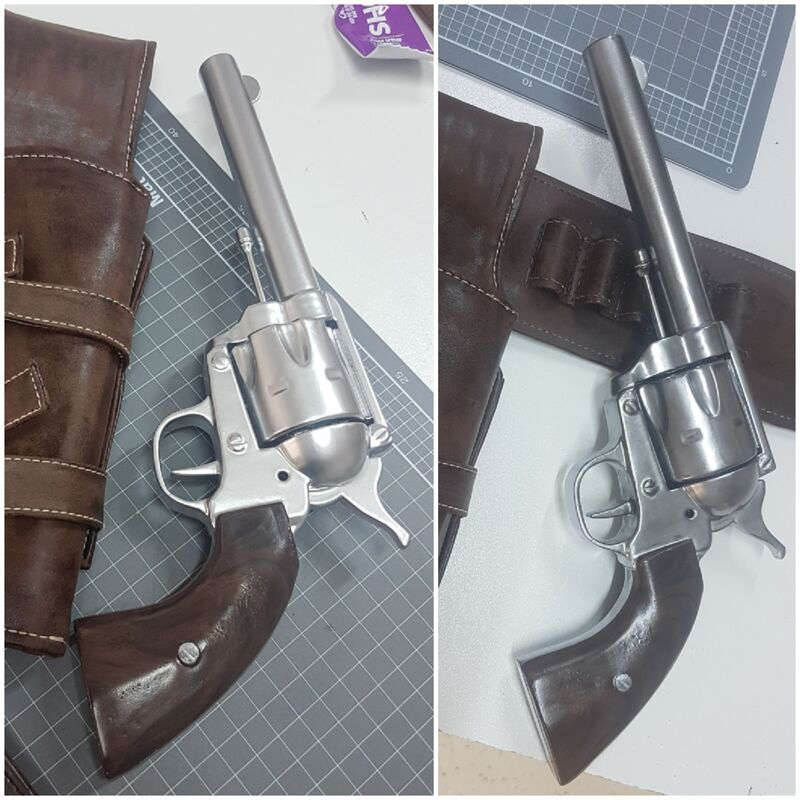
...The Revolver
|
|
OK! Moving on to the revolver. So, I bought the 3D print from here:
http://www.theprintingplatform.com/product/red-dead-redemption-2-double-action-revolver/ These guys do amazing work as a base, and I did a lot of research on how to finish it to a convincing level of realism. Let's face it, it's not going to be perfect considering this is my first ever prop paint, but I was pretty happy with how it turned out. |
I started by heading to my local Auto shop and picking up some automotive putty and spray putty. From there the revolver was reshaped a little with my dremel (the handle wasn't rounded) before filling the holes and giving it about 3x coats with the spray putty. I then sanded it down to within an inch of it's life with sandpaper of all grits and sizes...finishing it with a very fine sandpaper so I would get a smooth finish.
|
I used my dremel to etch out the details on the revolver before painting it. I taped up the metal parts of the gun, sprayed the handle with a matte brown before drawing (painstakingly) the wood grain onto it by hand with pencils. After I was happy with this I sprayed it with a clear coat.
One thing I realised too late (and felt like a twit when I did realise) was that I used watercolour pencils. Dumb move Vulpine. I should have used something else because when sprayed with the clear coat the layers and layers of watercolour cracked a little. nothing that wasn't fixable. But it broke my heart a bit. But anyway, it still looked good. So I painted up the screws with some good old Rub'n'buff and moved onto the metal of the gun. |

|
|
I started here by taping off my handle and spraying the whole thing with a couple of coats of a mirror finish silver spray paint. It gave the right base colour for me and after leaving it overnight I polished the sugar and spice out of it with Graphite powder to get it looking more...metal-ly. I'm actually really happy with how this came out. It looks pretty good to me, and after a little bit of black paint dry brushing to increase the depth of it I was pretty stoked with how this came out.
Oh! And heads up, DO NOT try to do a clear coat over the top of a graphite powder polish. It will dull the metal look and mirror like effect. Left side is without graphite, right side is with. |
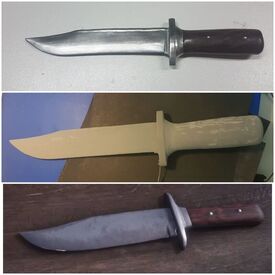
The Knife...
|
Yeaaah, so...everything you just read above, copy and paste it down here only this time imagine I'm talking about a knife that was 3D printed by these guys:
https://www.etsy.com/au/listing/680028073/3d-printed-combat-knife-con-safe?ga_order=most_relevant&ga_search_type=all&ga_view_type=gallery&ga_search_query=con+safe+knife&ref=sr_gallery-1-2&organic_search_click=1&col=1 I had to do quite a bit more reshaping with this knife than with the gun, just because I have freakishly small hands and this knife was like...12.5 inches long. In my hand it looked a lot more like a machete than a hunting knife, so I shaved about 2.5 inches off it altogether. I'm not...as happy with how this came out? But honestly that is my own fault. I wasn't as careful with my finishing on this one because I thought I knew what I was doing. This is a dumb mistake. Don't be like me. |

|
...The Bag

|
I found a really good bag in Target for $15 and just went wild with it. I started by adding the front detailing that Arthur has on his bag and the rivets/metal circle thingies that I picked up from Spotlight. I was struggling with dying the bag until I decided to just dunk the whole thing in a brown poly dye bath. This worked great, and then I ran around my parents farm with it and slammed it into things/dragged it along the road until it looked...kinda sad. Perfect, but sad.
|
Bullets...
|
Originally I wasn't going to have bullets to put in my gun belt, but then this amazing photographer came along and said, 'Hey! I think I can make the casings for you', and I went 'Really?' and he said "Yeah, give me a couple hours'. And then he went away and created 15 masterpieces that I filled with moldable plastic and graphite-d up so the bullet itself looked like it was made of lead.
By our powers combined! Voila! |

|
The Scars...
|
|
I have to add this in here. It's not really noticeable from the photos but I went to great effort to make sure I had Arthur Morgan's scars. I used a Rigid Collodion, which worked great, with a little lip liner underneath to make the scars a little pinker. I struggled to look sunburnt, but can you believe that the me you see in those pictures up top is a me with a HUGE amount of fake tan? Yeah. Yeah, I am basically translucent in real life. I am so white you can't see me in white sand.
|
Other, less wall-of-text worthy accessories:
|
|
- SPURS & LASSO: I was loaned these from a workmate who is a real life cowpoke, and whom I think spent equal amounts of time encouraging me and shaking her head at my ridiculous excitement over this costume.
- NECKERCHIEF: I made it, scrap black fabric, big triangle, sod of a thing to hem.
Ah, well. I think that's it! This one is done! Wow. That was an adventure and a half. I hope you guys liked this project...if anyone is readying this. Anyway. Scroll up if you'd like to have another look at the pictures for this project, I am so happy with how they came out!
And until next time...
And until next time...